WCF: Basic HTTP Binding (basicHttpBinding)
My first experience with one computer talking to another was when Dad brought home a terminal consisting of an acoustic coupler and a printer with thermal paper. We had a short list of BBS phone numbers in the Houston area; we'd dial one, wait for the screech and clicks and pops, set the phone handset into the acoustic coupler, and wait for a welcome message to print out on the thin curly paper. We'd then type a message back or a request, and wait for the BBS to respond. It was 300 baud, it would fail if picked up the phone in the other room, the printouts lasted about five days before they'd either fade or -- if left where the sun hit them -- turn black and curl up.
But -- holy smokes! -- that was the coolest thing I had ever seen. It's debatable whether or not that dumb terminal counted as a computer. But, for all my little junior high brain could tell, that was one machine talking to another machine.
Years later I would spend way too much time in my university's computer labs working not on my assignments but rather on simple programs that allowed one process to talk to another. And, since I lucked into a job at the Computing Center I had first crack at TCP/IP and other networking technologies way before my classmates did. Sure, it was all TCP/IP packet drivers and Novell Netware, token ring, and coaxial cable (always terminate your cable run!!) but I found it fascinating. Where on earth was the fun in writing a program in class to solve the Towers of Hanoi problem when I could spend the afternoon elbows deep in manuals, cabling, and [finger tip deep] in NIC jumpers, rigging things so that when I pushed a button on one computer and see something showed up on the screen of another?
Fast forward to the present and we have 802.11 ac instead of token ring and app.config and instead of NIC jumpers. (Hush it -- I don't want to hear that I'm not comparing apples to oranges.) So much has changed, but I still like getting one computer to talk to another.
Windows Communication Foundation, otherwise known as WCF, has done much to simplify communications between software. We can use it not only within the .NET ecosphere but to consume and provide data with the world at large. RESTful APIs, homegrown VPNs, peer-to-peer applications, distributed computing -- you can do tons with WCF.
However, I usually get boxed into or choose to use the same bindings and techniques again and again. That's always bugged me and I felt bad about not writing at least the obligatory "Hello, World!" program for each of the twelve system-provided bindings.
This post and more to come hopefully rectify that condition and provide some lessons along the way.
The Basic HTTP Binding
The basic HTTP binding is used to configure and expose endpoints which can communicate with ASMX-based Web services and clients plus other services that conform to the WS-I Basic Profile 1.1. If you're developing new software or working on anything that's even remotely recent, then you probably won't deal with the system-provided basic HTTP binding. But, if you're at a large organization with entrenched systems, then you may run across one or more services still tied to ASMX technology.
In any case, the first on our list and the easiest to set up and get running,
Writing the Service
Our service is basic: When it receives a request from a client, it will respond with the value it just received from a client.
Our service is comprised of the following pieces:
After that, we'll augment the service with with a self hosted application. In the real world, a self hosted service has its pros and cons; in our examples, it satisfies my need for "push a button here and see something happen there."
Note: For your convenience, you can download the following files:
Note: You could eschew an interface and use a class directly. But, an interface is the better way to go because an interface directly models a service contract and conveniently groups similar or related methods. That second point is especially important as your service grows into or becomes part of a non-trivial system.
There's nothing particularly different about our interface except that it uses attributes to designate the interface as a service contract and mark which methods are part of the contract:
IMyWcfService.cs
using System.ServiceModel;
namespace MyWcfService
{
[ServiceContract]
public interface IMyWcfService
{
[OperationContract]
string GetData(int value);
}
}
So, we have an interface (a service contract) that provides one method (an operations contract). The method accepts an integer and returns a string. What we do with that integer and how we derive the string we're going to return is left to our implementation, a class.
MyWcfService.svc.cs
namespace MyWcfService
{
public class MyWcfService : IMyWcfService
{
public string GetData(int value)
{
return string.Format("You entered: {0}", value);
}
}
}
Why the .svc.cs file extension? This is the service host file and is created automatically when you create a new project using Visual Studio and pick the template "WCF Service Application". (Note that when you create your project using the template the file will have a different name. You'll need to refactor the file to get the name you want or need.) The file with this extension is recognizable to IIS and easily launched and managed. You could use a different file extension but stick with this one for now.
Other than the .svc file extension, this class doesn't differ from any other class.
Here's our basic configuration file:
<?xml version="1.0"?>
<configuration>
<appSettings>
<add key="aspnet:UseTaskFriendlySynchronizationContext" value="true" />
</appSettings>
<system.web>
<compilation debug="true" targetFramework="4.5" />
<httpRuntime targetFramework="4.5"/>
</system.web>
<system.serviceModel>
<behaviors>
<serviceBehaviors>
<behavior>
<serviceMetadata httpGetEnabled="true" httpsGetEnabled="true"/>
<serviceDebug includeExceptionDetailInFaults="false"/>
</behavior>
</serviceBehaviors>
</behaviors>
<protocolMapping>
<add binding="basicHttpsBinding" scheme="https" />
</protocolMapping>
<serviceHostingEnvironment aspNetCompatibilityEnabled="true" multipleSiteBindingsEnabled="true" />
</system.serviceModel>
<system.webServer>
<modules runAllManagedModulesForAllRequests="true"/>
<directoryBrowse enabled="true"/>
</system.webServer>
</configuration>
The sections pertinent to our service are highlighted. The fundamental part is the endpoint -- the thing with which clients are going to connect when they want to use our service. Our endpoint can be found at the relative URI "/basic", uses the binding "basicHttpBinding", and will be fulfilled by the contract described by our interface, MyWcfService.IMyService.
Wait? Is that a complete address? Where's the host name and port set up? In this case, our project settings have taken care of that. If we open up Properties for our project and look at the web settings, we see the following:

Our service will be hosted by our Visual Studio Development Service, at its root, and through port 11042.
You can change any of these settings -- and most likely will for real-world applications -- but for our simple example these settings are sufficient.
Running the Service
Running the service is easy. Press F5, watch the code build, and then wait for a web browser window to open:

What we see is our code as hosted by the web service. To invoke the service itself, click on the service host file, MyWcfService.svc. Doing so brings us to this web page:

If we see this, then we know our service is working. Well, we know it's working well enough that the web server knows that it's a WCF service and gives us information on how to obtain the metadata necessary to build a client that can use the service. In any case, what we have is the "Hello, World!" version of a WCF service that uses the first system-provided binding.
So, how do we use this service?
A Client to Use Our Service
What we need next is a client that can hit the endpoint described in the service's configuration file, call one of the methods described in the service contract (our interface), and -- if our method signature so says to -- get a value back.
If we get all this working, then we have the "push a button here and something happens there" scenario which makes me oh-so-happy.
Our client has three parts:
The Configuration File
Generating the Configuration File and Proxy Code


Where to Go from Here
But -- holy smokes! -- that was the coolest thing I had ever seen. It's debatable whether or not that dumb terminal counted as a computer. But, for all my little junior high brain could tell, that was one machine talking to another machine.
Years later I would spend way too much time in my university's computer labs working not on my assignments but rather on simple programs that allowed one process to talk to another. And, since I lucked into a job at the Computing Center I had first crack at TCP/IP and other networking technologies way before my classmates did. Sure, it was all TCP/IP packet drivers and Novell Netware, token ring, and coaxial cable (always terminate your cable run!!) but I found it fascinating. Where on earth was the fun in writing a program in class to solve the Towers of Hanoi problem when I could spend the afternoon elbows deep in manuals, cabling, and [finger tip deep] in NIC jumpers, rigging things so that when I pushed a button on one computer and see something showed up on the screen of another?
Fast forward to the present and we have 802.11 ac instead of token ring and app.config and instead of NIC jumpers. (Hush it -- I don't want to hear that I'm not comparing apples to oranges.) So much has changed, but I still like getting one computer to talk to another.
Windows Communication Foundation, otherwise known as WCF, has done much to simplify communications between software. We can use it not only within the .NET ecosphere but to consume and provide data with the world at large. RESTful APIs, homegrown VPNs, peer-to-peer applications, distributed computing -- you can do tons with WCF.
However, I usually get boxed into or choose to use the same bindings and techniques again and again. That's always bugged me and I felt bad about not writing at least the obligatory "Hello, World!" program for each of the twelve system-provided bindings.
This post and more to come hopefully rectify that condition and provide some lessons along the way.
The Basic HTTP Binding
The basic HTTP binding is used to configure and expose endpoints which can communicate with ASMX-based Web services and clients plus other services that conform to the WS-I Basic Profile 1.1. If you're developing new software or working on anything that's even remotely recent, then you probably won't deal with the system-provided basic HTTP binding. But, if you're at a large organization with entrenched systems, then you may run across one or more services still tied to ASMX technology.
In any case, the first on our list and the easiest to set up and get running,
Writing the Service
Our service is basic: When it receives a request from a client, it will respond with the value it just received from a client.
Our service is comprised of the following pieces:
- An interface
- An implementation of the interface
- A configuration file
After that, we'll augment the service with with a self hosted application. In the real world, a self hosted service has its pros and cons; in our examples, it satisfies my need for "push a button here and see something happen there."
Note: For your convenience, you can download the following files:
Interface
The interface describes a contract provided by our service and explains what the service offers and how to get it.Note: You could eschew an interface and use a class directly. But, an interface is the better way to go because an interface directly models a service contract and conveniently groups similar or related methods. That second point is especially important as your service grows into or becomes part of a non-trivial system.
There's nothing particularly different about our interface except that it uses attributes to designate the interface as a service contract and mark which methods are part of the contract:
IMyWcfService.cs
using System.ServiceModel;
namespace MyWcfService
{
[ServiceContract]
public interface IMyWcfService
{
[OperationContract]
string GetData(int value);
}
}
Class
The class implements the interface, which in our case means determining what to do with that integer and what the string returned should be. This is C# 101, right?MyWcfService.svc.cs
namespace MyWcfService
{
public class MyWcfService : IMyWcfService
{
public string GetData(int value)
{
return string.Format("You entered: {0}", value);
}
}
}
Why the .svc.cs file extension? This is the service host file and is created automatically when you create a new project using Visual Studio and pick the template "WCF Service Application". (Note that when you create your project using the template the file will have a different name. You'll need to refactor the file to get the name you want or need.) The file with this extension is recognizable to IIS and easily launched and managed. You could use a different file extension but stick with this one for now.
Other than the .svc file extension, this class doesn't differ from any other class.
Web.Config
The Web.config file provides the information necessary put our service out there at a specific address, using a specific binding (in our case, it's going to be good old HTTP), and using a specific contract. These three elements -- address, binding, and contract -- are commonly referred to as the ABCs of WCF programming.Here's our basic configuration file:
<?xml version="1.0"?>
<configuration>
<appSettings>
<add key="aspnet:UseTaskFriendlySynchronizationContext" value="true" />
</appSettings>
<system.web>
<compilation debug="true" targetFramework="4.5" />
<httpRuntime targetFramework="4.5"/>
</system.web>
<system.serviceModel>
<behaviors>
<serviceBehaviors>
<behavior>
<serviceMetadata httpGetEnabled="true" httpsGetEnabled="true"/>
<serviceDebug includeExceptionDetailInFaults="false"/>
</behavior>
</serviceBehaviors>
</behaviors>
<protocolMapping>
<add binding="basicHttpsBinding" scheme="https" />
</protocolMapping>
<serviceHostingEnvironment aspNetCompatibilityEnabled="true" multipleSiteBindingsEnabled="true" />
</system.serviceModel>
<system.webServer>
<modules runAllManagedModulesForAllRequests="true"/>
<directoryBrowse enabled="true"/>
</system.webServer>
</configuration>
The sections pertinent to our service are highlighted. The fundamental part is the endpoint -- the thing with which clients are going to connect when they want to use our service. Our endpoint can be found at the relative URI "/basic", uses the binding "basicHttpBinding", and will be fulfilled by the contract described by our interface, MyWcfService.IMyService.
Wait? Is that a complete address? Where's the host name and port set up? In this case, our project settings have taken care of that. If we open up Properties for our project and look at the web settings, we see the following:
Our service will be hosted by our Visual Studio Development Service, at its root, and through port 11042.
You can change any of these settings -- and most likely will for real-world applications -- but for our simple example these settings are sufficient.
Running the Service
Running the service is easy. Press F5, watch the code build, and then wait for a web browser window to open:
What we see is our code as hosted by the web service. To invoke the service itself, click on the service host file, MyWcfService.svc. Doing so brings us to this web page:
If we see this, then we know our service is working. Well, we know it's working well enough that the web server knows that it's a WCF service and gives us information on how to obtain the metadata necessary to build a client that can use the service. In any case, what we have is the "Hello, World!" version of a WCF service that uses the first system-provided binding.
So, how do we use this service?
A Client to Use Our Service
What we need next is a client that can hit the endpoint described in the service's configuration file, call one of the methods described in the service contract (our interface), and -- if our method signature so says to -- get a value back.
If we get all this working, then we have the "push a button here and something happens there" scenario which makes me oh-so-happy.
Our client has three parts:
- an executable -- in our case, a Windows console application
- a proxy for the service we wish to use
- a configuration file -- app.config, in our case
Of these, the proxy is the most interesting with the configuration file being a a close second.
The proxy is a class we instantiate and whose methods mirror (that is, act as a proxy for) those found on the service. The configuration file is a standard .NET configuration file but, like the one used for the service, contains a <system.serviceModel> section. Both the proxy and the configuration file are covered in detail below.
The Proxy
The proxy is the conduit through which our client works with the code found within our service.
Among other things, the proxy contains the same methods and properties as those found in the service. It is these proxied methods and properties we call and, in turn, trigger a call "across the wire" to the service. The service then works its magic, returns none, one, or more values to the proxy, which then turns over the results to our calling code. That's an over-simplification but still the general idea.
So, where do we get the proxy or how do we create the code? If we wrote the service, then we know the contracts involved and thus the method signatures we have available to us. Still, it's going to be tedious to do all the plumbing necessary to get the proxy to talk to the service. And, if we didn't create the service and don't know for sure (or at all) what methods we have available, then what?
Luckily, there's tools we can use to automatically create the proxy.The ServiceModel Metadata Utility Tool (Svcutil.exe) is a command-line tool that generates code from metadata provided by our service. Since that's the same tool that will stub out the Service.ServiceModel configuration section we need for our configuration file, we'll discuss it right after we take a look at the configuration file.
Here's the proxy, as generated by the utility (which, as mentioned, we'll discuss in detail in a bit):
//------------------------------------------------------------------------------
// <auto-generated>
// This code was generated by a tool.
// Runtime Version:4.0.30319.42000
//
// Changes to this file may cause incorrect behavior and will be lost if
// the code is regenerated.
// </auto-generated>
//------------------------------------------------------------------------------
[System.CodeDom.Compiler.GeneratedCodeAttribute("System.ServiceModel", "4.0.0.0")]
[System.ServiceModel.ServiceContractAttribute(ConfigurationName="IMyWcfService")]
public interface IMyWcfService
{
[System.ServiceModel.OperationContractAttribute(Action="http://tempuri.org/IMyWcfService/GetData", ReplyAction="http://tempuri.org/IMyWcfService/GetDataResponse")]
string GetData(int value);
[System.ServiceModel.OperationContractAttribute(Action="http://tempuri.org/IMyWcfService/GetData", ReplyAction="http://tempuri.org/IMyWcfService/GetDataResponse")]
System.Threading.Tasks.Task<string> GetDataAsync(int value);
}
[System.CodeDom.Compiler.GeneratedCodeAttribute("System.ServiceModel", "4.0.0.0")]
public interface IMyWcfServiceChannel : IMyWcfService, System.ServiceModel.IClientChannel
{
}
[System.Diagnostics.DebuggerStepThroughAttribute()]
[System.CodeDom.Compiler.GeneratedCodeAttribute("System.ServiceModel", "4.0.0.0")]
public partial class MyWcfServiceClient : System.ServiceModel.ClientBase<IMyWcfService>, IMyWcfService
{
public MyWcfServiceClient()
{
}
public MyWcfServiceClient(string endpointConfigurationName) :
base(endpointConfigurationName)
{
}
public MyWcfServiceClient(string endpointConfigurationName, string remoteAddress) :
base(endpointConfigurationName, remoteAddress)
{
}
public MyWcfServiceClient(string endpointConfigurationName, System.ServiceModel.EndpointAddress remoteAddress) :
base(endpointConfigurationName, remoteAddress)
{
}
public MyWcfServiceClient(System.ServiceModel.Channels.Binding binding, System.ServiceModel.EndpointAddress remoteAddress) :
base(binding, remoteAddress)
{
}
public string GetData(int value)
{
return base.Channel.GetData(value);
}
public System.Threading.Tasks.Task<string> GetDataAsync(int value)
{
return base.Channel.GetDataAsync(value);
}
}
The configuration file, be it App.config or Web.config, is simply your typical configuration file but with the addition of a section for System.ServiceModel. Below is the application configuration file we'll use for our client:
<?xml version="1.0" encoding="utf-8" ?>
<configuration>
<startup>
<supportedRuntime version="v4.0" sku=".NETFramework,Version=v4.5" />
</startup>
<system.serviceModel>
<bindings>
<basicHttpBinding>
<binding name="BasicHttpBinding_IMyWcfService" />
</basicHttpBinding>
</bindings>
<client>
<endpoint
address="http://localhost:11042/MyWcfService.svc"
binding="basicHttpBinding"
bindingConfiguration="BasicHttpBinding_IMyWcfService"
contract="IMyWcfService"
name="BasicHttpBinding_IMyWcfService" />
</client>
</system.serviceModel>
</configuration>
The Service Model section has been highlighted.
Note that where our configuration file for our service has a sub-section labeled "service" this configuration file has a section labeled "client". The endpoint, though, seems very similar. It describes the address where the service is located, the binding to use when talking to it, and the contract to use.
The address contains we need to know where to reach the service:
- protocol: http
- host: localhost
- port: 11042
- service host file: MyWcfService.svc
- path: /
The binding, basicHttpBinding, matched the binding we're using on the service. And, the contract is specified via the interface (provided in the proxy code).
You can certainly create the configuration file and proxy code by hand; there's more than a couple of good tutorials on doing so. However, for our immediate purpose we'll stick with automatically creating one through the use of the The ServiceModel Metadata Utility Tool (Svcutil.exe).
The service (as configured at the moment) automatically emits metadata that can be used to write the Service Model section of our configuration file plus generate the service contract (interface) and plumbing (channel) needed by our client.
So, launch your service, wait for the browser to open, and then click on the .svc file. You should get something similar to this:
Copy the example of the svcutil.exe call.
Next, open a Visual Studio command prompt and then navigate to a folder (you may need to create one) where you don't mind storing the configuration file and source code the tool is about to create.
Next, paste the example of the svcutil.exe call into the command line window and run it. If all goes well, then the utility will create two files in the folder in which it was run. If something goes wrong, then the first thing you should check is that the service is running.
Close the command line window and return to Visual Studio.
The Executable File
To tie everything together you'll need an executable program. We're going to use a Windows console application.
The console application will instantiate a proxy object (which reads the client and endpoint information from the configuration file), call the service, and then display what it gets back from the service.
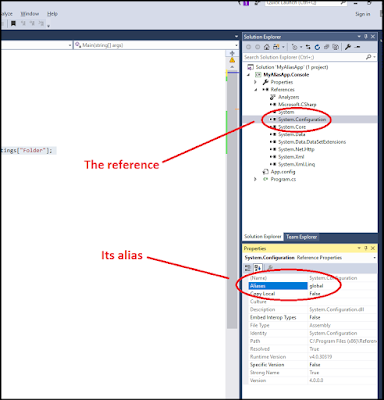
Create a Windows console application. Next, add references to the following:
- System.ServiceModel
You may also have to add references to:
- System.Runtime.Serialization
- System.XML
Next, open the App.config file and open the sample configuration file generated by the svcutil.exe tool. Copy the service.ServiceModel section from the sample configuration file into your real App.config file. Save and close the files.
Add to your project the proxy. Right-click on your project, select Add -- Existing Item... and then select the proxy file MyService.cs.
Finally, open up Program.cs and add the statement necessary to declare & instantiate the proxy, call the service, display the results, and close the proxy. The results should look something like:
using System;
namespace MyWcfService.ClientConsole
{
class Program
{
static void Main(string[] args)
{
// declare and instantiage the WCF client
var client = new MyWcfServiceClient();
// call a method from the service
var result = client.GetData(10);
Console.WriteLine("You enetered " + result);
// close the client.
client.Close();
}
}
}
Save this file and build the project and solution.
Double-check that your service is running. If it's not, then start it. Now you're ready to run your client and see what happens.
Run your client; You should get a window like this:
Voila! Your client used basic HTTP binding and successfully talked to the service.
Even with such a simple program and basic service, there's lots more to explore. Before moving on to other bindings, we'll discuss self-hosting plus do some essential housekeeping to make our service more robust and practical.
Comments
Post a Comment