WCF: Basic HTTP Binding (A Self Hosted Service)
Before we leave the basic HTTP binding behind and move on to others, let's create a self hosted WCF service.
Where to Host the Service
There's actually four ways to host a WCF service:


<?xml version="1.0" encoding="utf-8" ?>
<configuration>
<configSections>
<section name="log4net" type="log4net.Config.Log4NetConfigurationSectionHandler, log4net"/>
</configSections>
<startup>
<supportedRuntime version="v4.0" sku=".NETFramework,Version=v4.5" />
</startup>
<system.serviceModel>
<services>
<service name="MyWcfService.MyService" behaviorConfiguration="BASIC">
<host>
<baseAddresses>
<add baseAddress="http://localhost:2374/MyService.svc"/>
</baseAddresses>
</host>
<endpoint
address="BASIC"
binding="basicHttpBinding"
contract="MyWcfService.IMyService"/>
<endpoint
address="MEX"
binding="mexHttpBinding"
contract="IMetadataExchange"/>
</service>
</services>
<behaviors>
<serviceBehaviors>
<behavior name="BASIC">
<serviceMetadata httpGetEnabled="true" httpsGetEnabled="true"/>
<serviceDebug includeExceptionDetailInFaults="true"/>
</behavior>
</serviceBehaviors>
</behaviors>
<serviceHostingEnvironment aspNetCompatibilityEnabled="true" />
</system.serviceModel>
<log4net>
<appender name="FileAppender" type="log4net.Appender.FileAppender">
<file value="MyWcfService-Host.log" />
<appendToFile value="true" />
<layout type="log4net.Layout.PatternLayout">
<conversionPattern value="%date [%thread] %-5level %logger [%property{NDC}] - %message%newline" />
</layout>
</appender>
<appender name="ConsoleAppender" type="log4net.Appender.ConsoleAppender" >
<layout type="log4net.Layout.PatternLayout">
<param name="Header" value="[Header]\r\n" />
<param name="Footer" value="[Footer]\r\n" />
<param name="ConversionPattern" value="%date [%thread] %-5level %logger [%property{NDC}] - %message%newline" />
</layout>
</appender>
<root>
<level value="ALL" />
<appender-ref ref="FileAppender" />
<appender-ref ref="ConsoleAppender"/>
</root>
</log4net>
</configuration>
Where to Host the Service
There's actually four ways to host a WCF service:
- Self-Hosting in a Managed Application: Very flexible and requires the least amount of infrastructure; this is what we're going to do in this post.
- Managed Windows Services: Great for long-running services that still need security but aren't message-based; your WCF service runs within an Application Domain under the service control manager.
- Internet Information Services: Good for HTTP-only services and where you may need load-balancing and other infrastructure necessary for highly-scaleable systems.
- Windows Process Activation: Handles protocols including and beyond HTTP, can use message-based activation.
There's a lot more that can be said about the pros and cons of the different hosting environments. I suggest you take a look at the MSDN document "Hosting Services" to get an overview.
The important take-away for our immediate purposes, though, is this: The essence of your service can remain the same even as you move it from environment to environment.
This very feature of WCF helped us immensely at work where we had a service that was beginning to drag. It was hosted as a Managed Windows Service on one server which was simply getting pounded. One of the first steps we did was move the service to multiple IIS machines, where it could be hosted in a load-balanced environment. Though there were some configuration changes necessary we didn't have to change the actual code comprising our service. (Depending on what your service does and how it interacts with other system, your mileage may vary.)
Later on we'll look at moving our simple service from one environment to another but today we'll focus on self hosting within managed code.
Building the Console Application to Host the Service
The first step is to add a new project to the WCF service solution. Be sure to set the new project as the startup project for the solution:
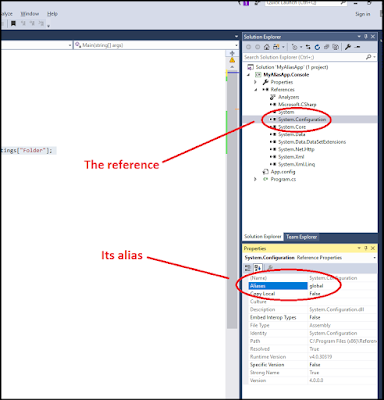
Next, add a reference to System.ServiceModel and then a reference to your service project.
Next, update the console application's configuration file by adding the settings necessary to expose the service and its endpoints. You can copy the System.ServiceModel configuration section from your original service's Web.config file and paste it into your console application's App.config file:
<configuration>
<configSections>
<section name="log4net" type="log4net.Config.Log4NetConfigurationSectionHandler, log4net"/>
</configSections>
<startup>
<supportedRuntime version="v4.0" sku=".NETFramework,Version=v4.5" />
</startup>
<system.serviceModel>
<services>
<service name="MyWcfService.MyService" behaviorConfiguration="BASIC">
<host>
<baseAddresses>
<add baseAddress="http://localhost:2374/MyService.svc"/>
</baseAddresses>
</host>
<endpoint
address="BASIC"
binding="basicHttpBinding"
contract="MyWcfService.IMyService"/>
<endpoint
address="MEX"
binding="mexHttpBinding"
contract="IMetadataExchange"/>
</service>
</services>
<behaviors>
<serviceBehaviors>
<behavior name="BASIC">
<serviceMetadata httpGetEnabled="true" httpsGetEnabled="true"/>
<serviceDebug includeExceptionDetailInFaults="true"/>
</behavior>
</serviceBehaviors>
</behaviors>
<serviceHostingEnvironment aspNetCompatibilityEnabled="true" />
</system.serviceModel>
<log4net>
<appender name="FileAppender" type="log4net.Appender.FileAppender">
<file value="MyWcfService-Host.log" />
<appendToFile value="true" />
<layout type="log4net.Layout.PatternLayout">
<conversionPattern value="%date [%thread] %-5level %logger [%property{NDC}] - %message%newline" />
</layout>
</appender>
<appender name="ConsoleAppender" type="log4net.Appender.ConsoleAppender" >
<layout type="log4net.Layout.PatternLayout">
<param name="Header" value="[Header]\r\n" />
<param name="Footer" value="[Footer]\r\n" />
<param name="ConversionPattern" value="%date [%thread] %-5level %logger [%property{NDC}] - %message%newline" />
</layout>
</appender>
<root>
<level value="ALL" />
<appender-ref ref="FileAppender" />
<appender-ref ref="ConsoleAppender"/>
</root>
</log4net>
</configuration>
The new lines in the configuration file are highlighted.
Note that this configuration file differs a little from the one we used earlier. Namely, we include the protocol, host, port and path in the address property; before we only used the path. This is because when we hosted the service using the Visual Studio Development Server, base address and port were set by the development server. When we self-host the WCF service, we have to take responsibility for setting those parameters ourselves.
Finally, update your program to declare & instantiate a ServiceHost object and then open, use, and close the object.
using System;
using System.Reflection;
using System.ServiceModel;
using log4net;
[assembly: log4net.Config.XmlConfigurator(Watch = true)]
namespace MyWcfService.Host
{
class Program
{
private static readonly ILog Logger = LogManager.GetLogger(MethodBase.GetCurrentMethod().DeclaringType);
static void Main()
{
Logger.Info("Entering Main().");
// Declare & instantiate a ServiceHost, using MyService proxy.
var selfHost = new ServiceHost(typeof(MyService));
// Use a try-catch for CommunicationException
try
{
// open the ServiceHost and wait for an incoming message.
selfHost.Open();
Console.WriteLine("The service is ready.");
Console.WriteLine("Press <ENTER> to terminate service.");
// Close the ServiceHostBase to shutdown the service.
Console.ReadLine();
selfHost.Close();
Logger.Info("Exiting Main().");
}
catch (CommunicationException ex)
{
Console.WriteLine("An exception occurred: {0}", ex.Message);
Logger.Error("An exception occurred: " + ex.Message);
selfHost.Abort();
}
}
}
}
As always, the key parts of the code are highlighted.
Running the Self-Hosted Service
The next step is to launch our program and make sure our client can reach it.
Build the project and start a debugging session. You should be greeted with a Windows console:
 So far, so good!
Now, launch the client (see this post for source code):


The next step is to launch our program and make sure our client can reach it.
Build the project and start a debugging session. You should be greeted with a Windows console:
Now, launch the client (see this post for source code):
Press the Enter key, wait a moment, and you should see that the client has gotten an answer from the service:
Now, if we check on our service's console window, we can confirm that it received something from a client:
Ta da! We were able to change the hosting environment supporting our service without changing either our basic service library or the client that uses the service.
(Note, too, how useful the logging we added previously has become.)
For the rest of our WCF binding experiments, we'll stick with the self-hosted service, where we can watch the log in real-time.
Comments
Post a Comment